Deploying Data as Code (Delphix + Terraform + Amazon RDS)
 |
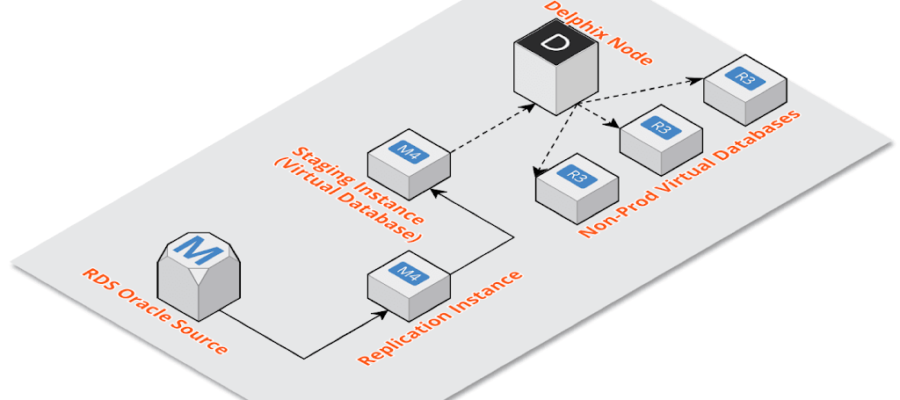
| Architecture diag from delphix. |
Last year Delphix blogged about how the Dynamic Data Platform can be leveraged with Amazon’s RDS (link here). Subsequently, they released a knowledge article outlining how the solution can be accomplished (link here).
I thought I would take the work I have been doing in developing terraform plugin and create a set of blueprints that could easily deploy a working example of the scenario. I also took that a step further and created some docker containers that would package up all of the requirements to make this as simple as possible.
This demonstration requires the Delphix Dynamic Data Platform and Oracle 11g. You will need to be licensed to use both.
TLDR;
- Build the packer template delphix-centos7-rds.json via the instructions found here: https://github.com/delphix/packer-templates
- Via terraform, build the blueprints found here: https://github.com/delphix/delphix-terraform-blueprints-rds
Walk Through
This example requires that you posses the proper privileges in an AWS account, access to Oracle 11g software, and access to version 5.2 of the Delphix Dynamic Data Platform in AWS.
Consult https://github.com/delphix/delphix-terraform-blueprints-rds details on the prerequisties.
- Ansible
- Packer
- Terraform
- Docker
- Delphix Dynamic Data Platform
Building the AMI
In this example, we will be using a simple configuration using Oracle 11g as the backend.
We will follow the instructions here to build the delphix-centos7-rds.json template
- First we clone the repo, then navigate into the directory.
- Next, copy the .example.docker file to .environment.env and edit the values to reflect our environment
- Now we run the docker container against the delphix-centos7-rds.json template to create our AMI.
Details of the command:- docker run – invoking docker to run a specified container
- –env-file .environment.env –passing in a file that will be instantiated as environment variables inside the container
- -v pwd:/build – mount the current working directory to /build inside the container
- -i – run the container in interactive mode
- -t – run a seudo tty
- cloudsurgeon/packer-ansible:latest – use the latest version of this image
- When the container starts, it will download the necessary Ansible roles required to build the image.
Build the Demo environment with Terraform
- First we clone the repo, then navigate into the directory.
- Next, copy the .example.docker file to .environment.env and edit the values to reflect our environment.
- See the Configuring section of the README for details on the variables.
- We will be using the cloudsurgeon/rds_demodocker container to deploy our demo environment. See the full description on https://hub.docker.com/r/cloudsurgeon/rds_demo for usage details.
-
run the rds_demo container to initialize the directory.
docker run — env-file .environment.env -i -t -v $(pwd):/app/ -w /app/ cloudsurgeon/rds_demo init -
run the rds_demo container to build out the environment.Details of the command:
-
docker run – invoking docker to run a specified container
-
–env-file .environment.env – passing in a file that will be instantiated as environment variables inside the container
-
-v $(pwd):/app – mount the current working directory to /app inside the container
-
-w /app/ – use /app as the working directory inside the container
-
-i – run the container in interactive mode
-
-t – run a seudo tty
-
cloudsurgeon/rds_demo:latest – use the latest version of this image
-
apply –auto-approve – pass along the apply flag to terraform and automatically approve the changes (avoids typing yes a few times)
-
Using the Demo
- Click the “Launch RDS Source Instance” button. The RDS Source Instance will open in a new browser tab.
-
Add someone, like yourself, as a new employee to the application
-
Once your new record is added. Go back to the application portal and launch the RDS Replica Instance
-
You are now viewing a read-only replica of our application data. The replica is a data pod running on the Delphix Dynamic Data platform. The data is being sync’d automatically from our source instance in RDS via Amazon DMS.
-
Go back to the application portal and launch the Dev Instance.The backend for the Dev Instance is also a data pod running on the Delphix Dynamic Data PlatformIt is a copy of the RDS replica data pod.Notice we don’t see our new record.That is because we provisioned this copy before we entered our new data.If we want to bring in the new data, we just need to simply refresh our Dev data pod.While we could definitely easily do that using the Dynamic Data Platform web interface, let’s do it via terraform instead.
-
In the terminal, we will run our same docker command again, but with a slight difference in the end.This time, instead of apply –auto-approve, we will pass phase_3 destroy –auto-approveDetails of the new parts of the command:
-
phase_3 – apply these actions only to phase_3
-
destroy – destroy the assets
-
–auto-approve – assume ‘yes’
Remember, phase_3 was just the creation of our virtual copy of the replica. By destroying phase_3, Terraform is instructing the DDP to destroy the virtual copy. -
-
If you login to the DDP (username delphix_admin/password is in your .environment.envfile), you will see the dataset being deleted in the actions pane.
-
If you close and relaunch the Dev Instance from the application portal again, you will see that the backend database is no longer present.
-
Now we run our Docker container again with the apply command. And it rebuilds phase_3
-
If you close and relaunch the Dev Instance from the application portal again, you will see that the backend database is present again and this time includes the latest data from our environment.
-
When you are finished playing with your demo, you can destroy all of the assets you created with the following docker command:docker run —env-file .environment.env –i -t -v $(pwd):/app/ -w /app/ cloudsurgeon/rds_demodestroy -auto-approve
-
It will take about 15-20 minutes to completely destroy everything.


Recent Comments